
Project Description
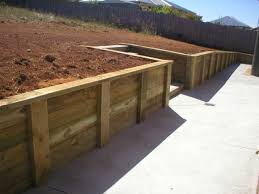
DIY Timber Retaining Wall
Love DIY? Need Help? Well we are here to help you with our handy Hints & DIY Guides!
Download the Richmond Sand & Gravel DIY Timber Retaining Wall Guide Here >
Timber Retaining Walls!
Let’s get started… Richmond Sand & Gravel would firstly like to say good luck!! and please use this as a guide only, each person’s site is different therefor we can only offer a broad guide on how to DIY, however we cannot accept any liability in respect to the content of this guide or work conducted using these guides. If you do not feel confident let us recommend a qualified tradie for you!
Step 1:
Measure out your wall
This will allow you to calculate materials needed as well as identify whether you need to seek council approval or engineering.
Typically, council approval is required on walls higher then 1m and less than 1.5m from a neighbouring building – however we cannot stress enough to check with your local council for its specific requirements as each council differs.
Richmond Sand & Gravel also recommend using a professional to construct walls that need council approval or engineering to ensure work is completed accurately and the correct drainage and construction is completed to ensure your wall lasts.
Step two:
Select your Materials
Timber Posts / Uprights:
Your posts should be a minimum of 75mm this for structure & stability however if your wall exceeds 1m in height engineers must be consulted on post thickness.
The height of the post is a simple rule of thumb – half in the ground half out, for example if your constructing a 600mm high wall then you will require a minimum 1.2m post.
Timber Rails:
Timber Rails can be either a 50mm thick but preferably a 75mm thick in either hardwood or treated pine.
The lengths of the rails are 2.4m to calculate how many you need simply measure the length of the wall and divide by 2.4. ie. A wall that is 10.5m long you will need (10.5 divide 2.4) 4.41 posts
Galvanised bolts – 200mm x 12mm
20mm Drainage Aggregate:
This is a drainage gravel that is placed behind the wall for drainage and also approx. 100mm in the bottom of each post hole. On average the quantity of gravel needed is calculated at a 300- 400mm width x the length of the wall x the desired height – please consult our team to help you calculate your qty.
Geo fabric:
This is a heavy duty landscapers fabric that is used to line the back of the wall and to cover the agg pipe to ensure that there is no seepage through the wall & the agg pipe is kept free draining and not clogged.
Agg Pipe:
Available in 20m lengths both 65mm & 100mm diameter, to be placed at the bottom of the back of the wall to drain water from behind the wall to a discharge point.
Concrete Mix / Rapid Set:
Used to set the posts in the ground – the cheapest option is to use a concrete mix – blend of 10mm & washed river sand and add GP or Builders Cement to a ratio of 4:1 Concrete Mix: Cement or;
Buy pre-blended bags of Rapid Set No Mix, which you just empty into the hole and add water.
Step 3:
Preparing the holes & Posts
• Set your string line attached to a post located at each end of your retaining wall
• Mark out where your holes are to go – we recommend for maximum reinforcing and strength when using 2.4m long rails to space your holes every 1.2m (one hole/post for every rail joint & another to the centre of every rail to prevent bowing)
• Dig holes in alignment with string line
• Each hole is to be dug to the recommended depth (dependant on the wall height – rule of thumb half in the ground half out ie. 600mm high wall will require 600mm of post to be cemented into the ground) * Add 100mm to the depth of each hole for 20mm drainage gravel.
• Place 100mm of 20mm drainage gravel in the bottom of each hole, the timber post will sit directly on this gravel which will ensure water drains away from the timber post.
• The width of each hole will depend on the width on the timber you purchase but ensure you have at least 75mm gap either side of your posts. Richmond Sand & Gravel recommend when using 2.4 x 200 x 75mm timber sleepers for posts dig a hole that is 300mm round.
Step 4:
Setting the Posts:
• You will need to place your posts on an angle which is a 1 in 10 slop, to achieve the correct angle place the post in the centre of the hole and level with a spirit level, once levelled measure 100mm from the back of the post and move the top of the post to this new marker – this will give you the correct angle. Secure your timber post will supports. Repeat this process on the opposite end and run your string line from the base and the top of the posts to give you a true line to work off ensuring all posts are set in alignment.
• Once your two outer posts are set and you have your string lines in place repeat the process with all your posts.
• Once All your posts are set in place at the correct angles, fill in the holes to ground level with either your concrete mix (4:1 concrete mix: cement) or Rapid set premixed cement
• Leave to set for at least 24 hours.
Step 5:
Attaching the Rails:
• Place your timber rails into position and clamp into to place, and set the rest of the first layer, once the first layer is positioned correctly and levelled bolt into place and repeat with 2nd 3rd etc layers.
Step 6:
Putting your drainage in:
• Line the back of your wall with geo fabric
• Position your agg pipe – socked or unsocked at the base of the back of the wall approx. 75mm off the wall, ensure your agg pipe drains away to a gutter, pit or another drainage point.
• Fill around the agg pipe and the back of the wall with 20mm drainage aggregate (gravel)- depth of gravel will be determined by the height of the wall, please talk to our staff for depth recommendations
• Wrap excess geo fabric over drainage agg
• Top with soil or decorative stone, to suit your desired landscape plans.
What you Need: Shopping List
Timber posts:
Treated pine 2.4m x 200 x 75
Treated Pine 3m x 200 x 75
Hardwood 2.4 x 200 x 75
Timber Rails:
Treated Pine 2.4 x 200 x 50
Treated Pine 3m x 200 x 50
Hardwood 2.4m x 200 x 50
Galvanised Bolts:
Drainage Aggregate (20mm)
Concrete mix
Cement
GP Cement
Builders Cement
Rapid Set no mix
Geo Fabric:
1m Roll per meter
2m Roll per meter
Agg Pipe:
100mm unsocked
100mm socked
65mm unsocked
100mm socked
Soil:
Topsoil
Garden mix
Landscape Mix
Tool Guide
• Appropriate Safety Gear – safety glasses & Gloves
• Circular saw or hand saw
• Tape measure
• Spirit Level
• Power drill and 12mm auger bit
• Shovel & Digging Spade
• Crow bar for use while digging
• String Line
• Wheelbarrow
• Concrete mixer
• Spanners or socket set


